This document takes OpenStreetMap for example to describe how to add a geographic map in a library component and use it in JDashboard.
- Open the catalog file SampleReports.cat in the SampleReports folder.
- Click File > New > Library Component on the menu bar.
- In New Library Component dialog, clear the text in the Library Component Title box, select Blank, and then click OK.
- Drag Geographic Map from the Toolbox panel to the library component. The Create Geographic Map wizard appears.
- In the Data screen of the wizard, select WorldWideSalesBV from Data Source 1. Then click Next.
- In the Display screen, add the fields Country and State in the Customers table as the group by fields one by one to the Drill Path box.
- Check the Enable Area checkbox. The Enable Marker checkbox is checked by default.
Next, we will define the marker and area properties for the country group level.
- Click Country in the Drill Path box, select Country from the Customers table in the Resources box and click
 to add it to the Shape By text box, then click
  beside the text box.
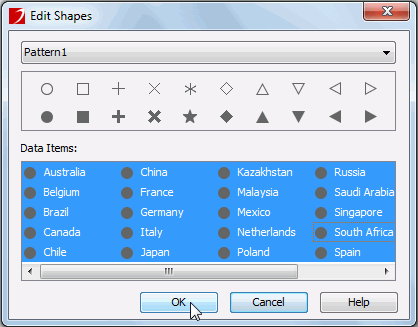
- In the Edit Shapes dialog, click anywhere in the Data Items box and click Ctrl + A on the keyboard to select all countries, then click
 in the preview box below the pattern name to apply the shape to all countries. Click OK to apply the shape.
- Select the aggregation Total Sales from the Orders Detail table in the Resources box and click to add it to the Color By text box, then click
 beside the text box.
- In the Edit Gradient Color dialog, keep the default gradient color, check the Middle Value checkbox and set its value to 625816.73, specify the opacity to 80%, then click OK to apply the gradient color.

- Select the aggregation Total Cost from the Orders Detail table in the Resources box and click to add it to the Size By text box, then click
 beside the text box to specify the zoom percentage to 370%. Click outside of the size box to apply the zoom percentage.
- Select Country from the Customers table in the Resources box and click to add it to the Label By text box of the Marker Options.
- Click
 beside the Marker Tip text field, then select <Create Formula> from its drop-down list to create a formula to control the marker tip information.
- In the Input Formula Name dialog, enter the name MarkerTipforCountry and click OK.
- In the Formula Editor window, define the formula as follows.
"Country:" + " " + @"Customers.Country" + "\n" +

      "Total Cost:" + " " + ToText(@"Orders Detail.Total Cost","$#,###.00") + "\n" +

    "Total Sales:" + " " + ToText(@"Orders Detail.Total Sales","$#,###.00")
- Save the formula and close the Formula Editor. MarkerTipforCountry will be displayed in the Marker Tip text field.

- Select the aggregation Total Sales from the Orders Detail table in the Resources box and click to add it to the Fill By text box, then click beside the text box.
- In the Edit Gradient Color dialog, select Green-White-Orange from the gradient color drop-down list, which is the last color at the second line in the list, specify the opacity to 80%, then click OK to apply the gradient color.
Next, we will specify the marker and area properties for the state group level.
- Click State in the Drill Path box, select State from the Customers table in the Resources box and click to add it to the Shape By text box, then click beside the text box.
- In the Edit Shapes dialog, select Pattern1 from the pattern drop-down list to apply the shapes in the pattern to all states, then click OK.
- Click beside the Size By text box to specify the zoom percentage to 230%. Click outside of the size box to apply the zoom percentage.
- Select the aggregation Total Sales from the Orders Detail table in the Resources box and click to add it to the Fill By text box, then click beside the text box.
- In the Edit Gradient Color dialog, select Green as the gradient color, which is the second color in the color list, specify the opacity to 80%, then click OK to apply the gradient color.
- Select State from the Customers table in the Resources box and click to add it to the Label By text box of the Area Options. Repeat this to add Total Sales from the Orders Detail table to the Label By text box.
- Repeat steps 14 to 17 to create another formula AreaTipforState to control the area tip information.
"Country:" + " " + @"Customers.Country" + "\n" +

"State:" + " " + @"Customers.State" + "\n" +

"Total Sales:" + " " + ToText(@"Orders Detail.Total Sales","$#,###.00")
- Repeat steps 14 to 17 to create another formula LocationInfoforState for the Location Info option.
@"Customers.State" + "," + @"Customers.Country"

- Click Next to enter the Filter screen. Click the Add Condition button to add a condition line, and specify the filter condition as @Country != USA , then click Finish to create the map.

- Select GeoMarker1 and GeoArea1 in the Report Inspector by pressing the Ctrl key on the keyboard and set their Invisible property to true. This is to hide information about the state group level from displaying at the initial map to improve the map appearance. You can still get the state information by applying the go-down action on the countries.
- Click File > Save to save the library component as Sales Map by Country.lc.


 on the side bar to display the Resources panel.

