Binding a link to a label
You can make the labels in a report linked with other reports, locations specified by URLs, e-mail addresses, or Blob data type fields. The link can either be a simple link or a conditional link. With conditional link, different targets can be loaded based on different conditions. However, conditional link is not supported on labels that are not bound with datasets.
To bind a simple link to a label:
- Right-click the label and click Link on the shortcut menu to display the Insert Link dialog.
- From the Link Type drop-down, select the target to which the label will be linked: Report, Master/Detail Report (available to page report only), URL, E-mail or Content.
- Specify the options for the link target.
- When done, click OK to create the link.
To bind a conditional link to a label:
- Right-click the label and click Link on the shortcut menu to display the Insert Link dialog.
- Check the Conditional Link checkbox.
- Click
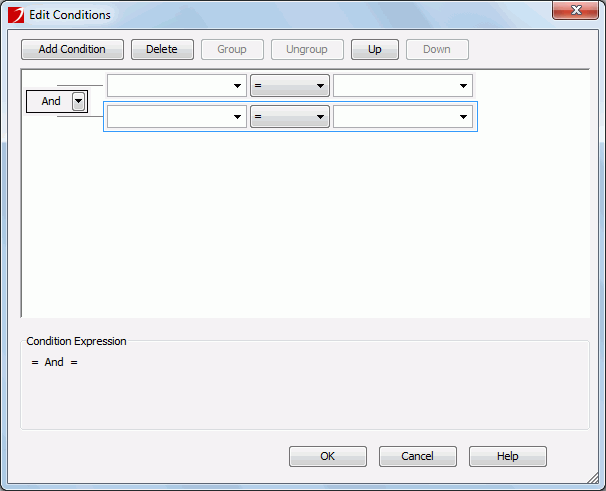
 above the conditions box. The Edit Conditions dialog appears. See the dialog.
- Click the Add Condition button to add a condition line.
- From the field drop-down list, select the field on which the condition will be based.
- Choose the operator with which to compose the condition expression from the operator drop-down list.
- From the value drop-down list, specify the value of how to build the condition. You can also type in the value manually.
- Click Add Condition to add more condition lines and define the relationship between the condition lines.
- When done, click OK to save the condition. The newly added condition will then be displayed and highlighted in the conditions box in the Insert Link dialog.
- From the Link Type drop-down, select the target to which the label will be linked under this condition: Report, Master/Detail Report (available to page report only), URL, E-mail or Content, then specify the options for the link target.
- Repeat the above steps to add more conditions and define the target for each condition.
To edit a condition, select the condition, click  , then edit it in the Edit Conditions dialog.
To adjust the priority of the conditions, select a condition and click the  or
or  button.
To remove a condition, select the condition and then click  .
.
-
Check the Others checkbox and define a target to which the label will be linked when none of the condition you have specified is met.
- When done, click OK to create the conditional link.
For an illustrated example, see Example of binding a conditional link.
When a link is created, you can further edit it or remove it if you want.
- To edit an existing link on a label, right-click the label and select Edit Link from the shortcut menu. Then in the Edit Link dialog, redefine the link.
- To remove a link from a label, right-click the label and select Remove Link from the shortcut menu.
See also the Insert Link dialog for page report or web report/library component and the Edit Link dialog for page report or web report/library component for additional information about options in the dialogs.
Tip: By default, the link action has the highest click priority at runtime. You can change the priority by setting the report's Click Priority property.
Linking to another report
In most cases, your reports are affiliated with one another, with each report emphasizing one or more aspects of a bigger picture. Relationships can be set up for users to browse from one report to another through the relationship "channels" created. You can achieve an inter-report relationship network by setting up the link conditions between two reports in the same catalog. Then, when you view the primary report at runtime, you can gain access to the linked report by clicking a trigger, which is an object defined in the primary report to load a linked report.
Usually, you can use a label, a field (DBField, summary, formula, parameter, or special field), or an image as a trigger object.
To make a label linked to another report:
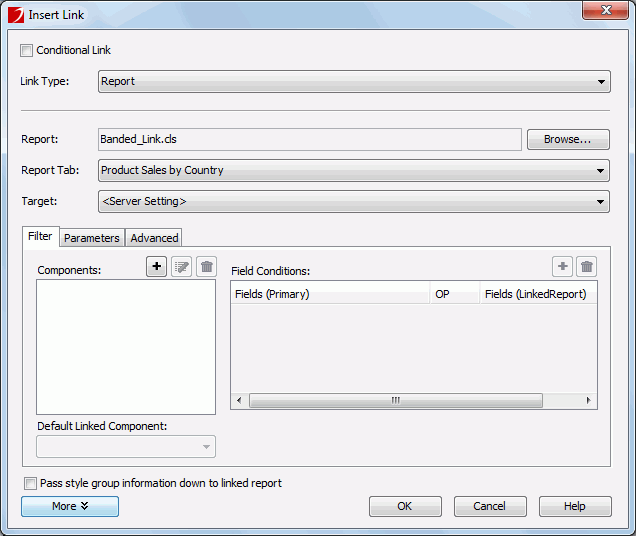
- In the Insert Link dialog, select Report as the link type. See the dialog.
- If the primary report is a page report, click the Browse button next to the Report text field to specify the page report in the same catalog that contains the report tab you want as the linked report. Then, select the report tab name from the Report Tab drop-down list.
If the primary report is a web report or a library component, click the Browse button to specify the web report in the same catalog that you want as the linked report.
- From the Target drop-down list, select where the linked report will be loaded.
The Target property works when the link is triggered in Page Report Studio or Web Report Studio. When the link is triggered in JDashboard, except for Same Frame, all the other targets are treated as New Window.
- Click the More button to display more options for setting the link.
- In the Filter tab, click the button above the Components box. In the Choose Component dialog, add the components in the linked report you want to be interlinked with the primary report. If the required components use different datasets, you need to add them respectively, however, as long as the components are based on the same dataset, you can add them all at a time.
- Specify the filter conditions based on which the link relationship between the primary report and the selected components in the linked report is set up.
- Select a component from the Components box.
- Click above the Field Conditions box and a condition line is added.
- Select the desired field of the primary report from the drop-down list in the Fields(Primary) column.
- Choose an operator from the drop-down list in the OP column.
- Specify the field/formula of the linked report from the drop-down list in the Fields(LinkedReport) column. All fields in the linked report of the same value type as the selected primary report field are available in the drop-down list.
- If necessary, you can specify more conditions by clicking the button and then specifying the primary report field, the operator, and the corresponding field in the linked report. Note that the relationship between these conditions is AND, which means that JReport will fetch linked report data which meets all of the conditions.
- Repeat the above steps to set link conditions between the primary report and other components in the linked report.
- From the Default Linked Component drop-down list, select which component in the linked report will be linked with the primary report by default.
- If the linked report contains one or more parameters, the Parameters tab will be enabled. In this tab, you can assign field of the primary report to parameter of the linked report. Then, when running the linked report from the link, the field value of the primary report will be assigned to the parameter automatically.
- If you would like the values of the filter objects such as filter controls and sliders in the primary report to be passed to filter objects in the linked report, go to the Advanced tab to set up the relationship between the filter objects as follows:
- Click to add a line.
- In the Primary Report Property/Object column, click
 to select a filter object in the primary report in the Select Value dialog and click OK.
- In the Linked Report Property/Object column, click to select a filter object in the linked report in the Select Value dialog and click OK. You need to make sure that values of the filter object in the primary report can be applied to the filter object in the linked report in the same line.
- Follow the above steps to set up the relationship between more filter objects.
- Check Pass style group information down to the linked report to transfer style information from the primary report to the linked report, so that the style of the primary report will apply to the linked report.
- Click OK to apply the settings.
Then, when you run the primary report at server runtime and click the label, you will find that the linked report is displayed according to the specified link conditions. You can also trigger the link in the HTML, PDF or Excel result if you check the Run Linked Report option in the corresponding format's export/option dialog.
Notes:
- A page report can only be linked with another page report, and a web report with another web report. For a library component, it can only be linked with a web report.
- When linking reports, you need to avoid link loops. For example, if you have linked report A to report B, then you cannot link report B back to report A again.
- The conditions specified in the Filter tab are used for filtering when the link is triggered at server runtime, that is, only the data that meet the conditions in the linked report will be displayed. However, when the link is triggered in HTML, PDF or Excel results, the conditions are used for setting up search criteria between the two linked reports, which means after you click the trigger object in the primary report, the pages containing the data that meet the conditions in the linked report will be displayed.
Linking to a detail report
Reports in the same catalog can be joined together in order to create a master/detail report group. Usually, the master report holds comprehensive data, while the detail reports hold related detailed information. A detail report can also be the master report of another report. In this way, you can set up more pairs of master/detail reports, where many reports are joined together, eventually leading to the formation of a report chain. Then, when you view the master report at runtime, you can gain access to the detail report by clicking a trigger, which is an object defined in the master report to load a detail report. However, in a master/detail report group, crosstab reports cannot be used as the master.
Usually, you can use a label, a field (DBField, summary, formula, parameter, or special field), or an image as a trigger object.
Master/detail report is supported on page report only at present.
To make a label linked to a detail report:
- In the Insert Link dialog, select Master/Detail Report as the link type. See the dialog.
- Click the Browse button next to the Report text field to specify the report in the same catalog which contains the report tab you want for the detail report, and then select the report tab name from the Report Tab drop-down list.
- Click the Browse button beside the Component field. In the Choose Component dialog, specify which component in the detail report you want to be interlinked with the master report with conditions. You can select more than one component as long as the components are based on the same dataset.
- From the Target drop-down list, select where the detail report will be loaded.
- Specify the join relationship between the master report and detail report in the Anchor section. The join can only have one condition. For example, the join can be: (Detail Report) Product ID = (Master Report) Product ID. The join condition should be as:
(Detail RPT) expression1 operator (Master RPT) expresion2
To make the join more meaningful, expression1 should be a column or record level formula in the GROUP section of a component in the detail report; and expression2 should be a column or record level formula in the DETAIL section of a component in the master report. This is because generally the master report is used to present comprehensive data, and the detail report to present more detailed information. To specify the join condition,
- Select a field/formula from the Column in Detail Report drop-down list. If this list does not offer the required field/formula, then you will need to specify the component with the data source that contains the specific field/formula. To do this, specify the component by clicking the Browse button besides the Component field.
- Choose the operator from the Operator drop-down list.
- Specify the field/formula of the master report from the Column in Master Report drop-down list. This field/formula should be of the same data type as the selected field/formula of the detail report.
- Click the More button to display more options for setting the link.
- In the Conditions tab, specify the filter conditions between the master report and the detail report.
- Click the add button above the Field Conditions box and a condition line is added.
- Select the desired field of the master report from the Fields(MasterReport) drop-down list.
- Choose an operator from the drop-down list in the OP column.
- Specify the field/formula of the detail report from the drop-down list in the Fields(DetailReport) column. All fields in the detail report of the same value type as the selected primary report field are available in the drop-down list.
- If necessary, you can specify more conditions by clicking the button and then specifying the master report field, the operator, and the corresponding field in the detail report. You can use the More column to specify the relationship between conditions to be AND or OR.
- If there is at least one parameter applied in the filters of the queries that the detail report uses, the Parameters tab will be enabled. In this tab, you can assign field of the master report to parameter of the detail report. Then, when running the detail report from the link, the field value of the master report will be assigned to the parameter automatically.
- If both reports use the same encoding and DB settings, you should check the option Use the same encoding and DB settings for the detail report as that of the master report. If this option is not checked, when the detail report is triggered at runtime, you will be prompted to specify the encoding and DB settings for the detail report.
- Click OK to confirm.
After a set of master/detail reports have been defined in JReport Designer and published to JReport Server, they can be viewed in Page Report Studio. The detail report supports all the page report operations, such as sort, filter, drill, and search.
Notes:
- The join and filter conditions work together. If you want to set a single condition, you can use join (anchor). If you want to set a group of conditions, you can use the filter conditions together with a join condition. The relationship between the join and filter conditions is "Join condition AND (filter conditions)".
- If you specify to load the detail report in a new browser window, the detail report will be opened independently when you click the trigger in Page Report Studio. That is to say, the join and filter conditions you have set between the master report and detail report will not be applied.
Linking to a URL
- In the Insert Link dialog, select URL as the link type. See the dialog.
- Enter the URL in the Hyperlink text box directly. If needed, click the Add Dynamic Field button to insert a field into the URL to compose a dynamic URL.
For example, you can compose a URL as follows: type in http://www.google.com/search?q= into the Hyperlink text box, then click the Add Dynamic Field button to insert the field Country at the end of the URL. Then at runtime, you can click the label to open a specific URL that directs to a specific country.
- Specify the frame from the Target drop-down list.
The Target property works when the link is triggered in Page Report Studio or Web Report Studio. When the link is triggered in JDashboard, except for Same Frame, all the other targets are treated as New Window.
- When done, click OK to set up the link.
Then, when you run the report at server runtime, or view it in HTML, PDF, or Excel format, you can click the label to open the URL.
Linking to an e-mail
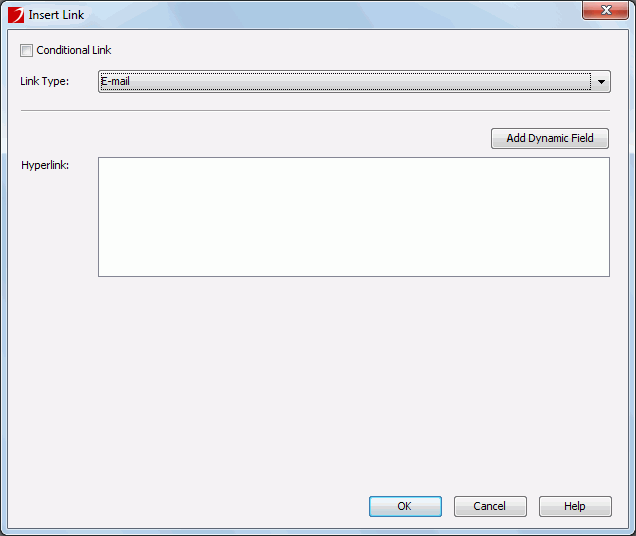
- In the Insert Link dialog, select E-mail as the link type. See the dialog.
- Enter the e-mail address in the Hyperlink text box directly. If needed, click the Add Dynamic Field button to insert a field into the e-mail address to compose a dynamic e-mail address.
- When done, click OK to set up the link.
Then, when you run the report at server runtime, or view it in HTML, PDF, or Excel format, you can click the label to open the e-mail with the information specified in the Hyperlink box. You can further customize the e-mail and send it.
Linking to a Blob data type field
You can make an object linked with a Blob data type field. The Blob data type field will then be bound to the object and displayed as a hyperlink. You can download the Blob content by clicking this hyperlink.
In JReport, Blob could be image, Binary, Blob, Clob, LongBlob, LongClob, Varbinary, Longvarbinary, and so on.
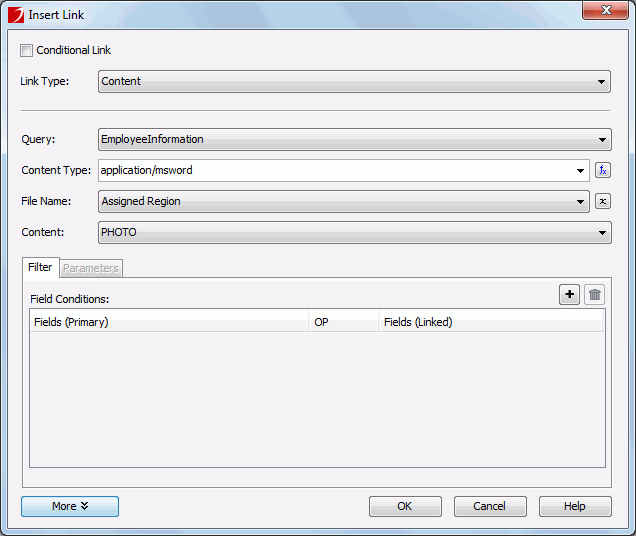
To make a label linked to a Blob data type field:
- In the Insert Link dialog, select Content as the link type. See the dialog.
- From the Query drop-down list, select the query (page report) or query based business view (web report and library component) which contains the required Blob data type field. Only queries/business views that come from the same data source connection as the query/business view used by the current report are available in the drop-down list.
- From the Content Type drop-down list, specify the content type for the Blob type data. You can also click the button
 to bind the content type with a field or a formula in the selected query/business view.
- In the File Name text field, specify a file name for the linked Blob type data. You can also click the button to specify a field or a formula in the selected query/business view to control the file name.
- From the Content drop-down list, choose a Blob data type field in the selected query/business view.
- Click the More button to display more link options.
- In the Filter tab, specify the filter conditions between the query/business view used by the current report and the query/business view that contains the linked Blob content as follows:
- Click above the Field Conditions box and a condition line is added.
- Select the desired field of the query/business view used by the current report from the Fields(Primary) drop-down list.
- Choose an operator from the drop-down list in the OP column.
- Specify the field/formula of the query/business view that contains the linked Blob content from the drop-down list in the Fields(Linked) column. All fields that are of the same data type as the selected field in the Fields(Primary) column are available in the drop-down list.
- If necessary, you can specify more conditions by clicking the button and then specifying the fields and operators accordingly. Note that the relationship between these link conditions is AND, which means that JReport will fetch the linked Blob type data which meets all of the conditions.
- If the query/business view that contains the linked Blob content uses parameters, the Parameters tab will be enabled. In this tab, you can assign fields of the query/business view used by the current report to the parameters. Then, when accessing the Blob type data from the link, the field values will be assigned to the parameters automatically.
- Click OK to apply the settings.
Then, when you run the report at server runtime, or view it in HTML, PDF, or Excel format, you can click the label to download the Blob content according to the specified conditions.
Example of binding a conditional link
This example shows the usage of conditional link and dynamic field.
- Open the report Link.wls located in
<install_root>\Demo\Reports\SampleReports\SampleReports.cat.
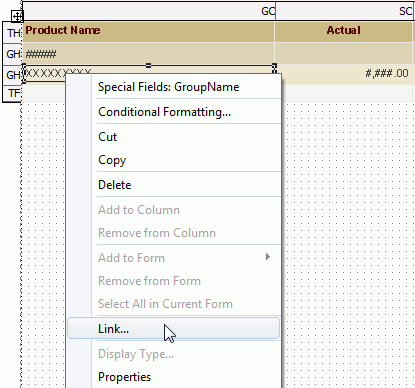
- We will define a link on the table of the report. Right-click on the Product Name field in the second group header row and then select Link from the shortcut menu.
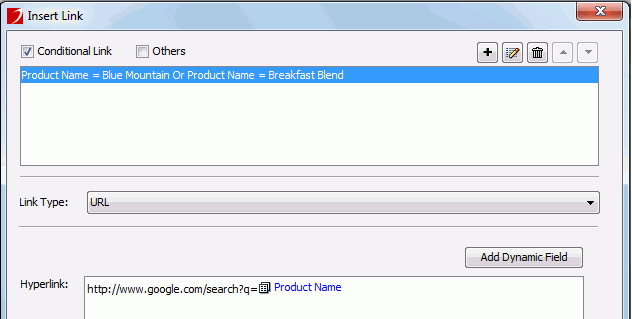
- In the Insert Link dialog, check the Conditional Link checkbox.
- Click to define a condition in the Edit Conditions dialog as follows.

- We will make the field linked to a URL target based on the condition. From the Link Type drop-down list, select URL. In the Message dialog, click Yes.
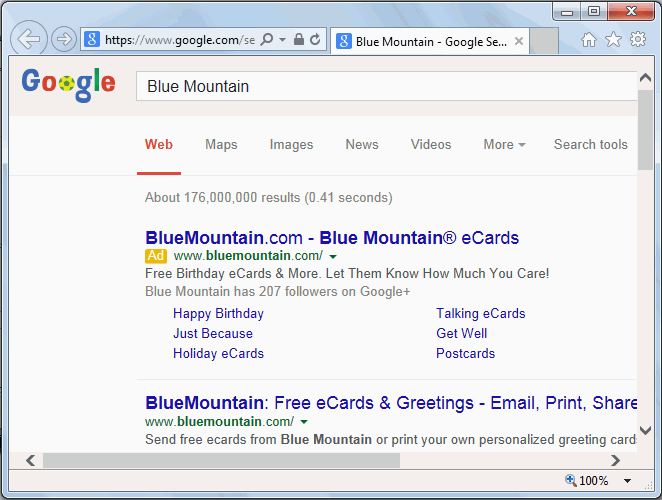
- In the Hyperlink text box, type in http://www.google.com/search?q= and then click the Add Dynamic Field button to insert the field Product Name at the end of the URL.
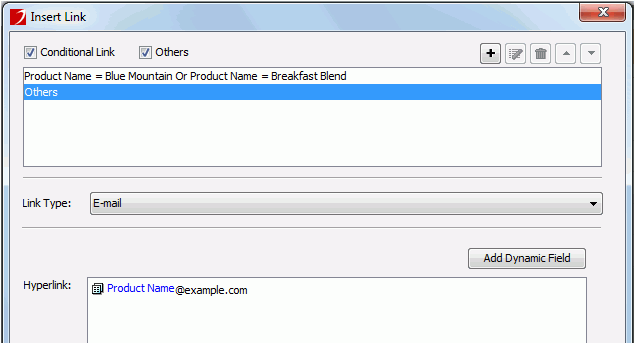
- For the product names other than Blue Mountain and Breakfast Blend, we will make them linked to an e-mail target. Check the Others checkbox. A condition named Others will be created.
- From the Link Type drop-down list, select E-mail. In the Message dialog, click Yes.
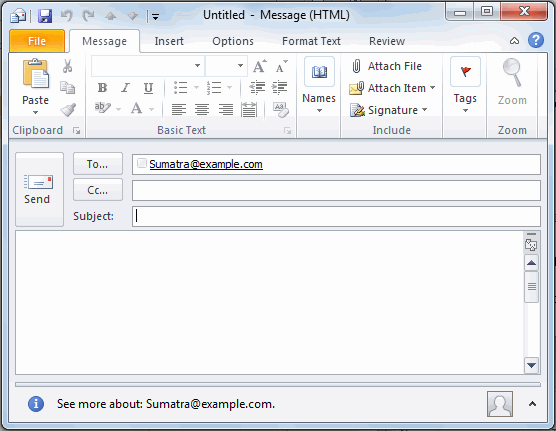
- In the Hyperlink text box, type in @example.com and then click the Add Dynamic Field button to insert the field Product Name right ahead of @.
- Click OK in the Insert Link dialog.
- Click View > Preview As > Web Report Result on the menu bar to view the report results in Web Report Studio. We can click the product names in the table to trigger the link.
- Click Blue Mountain and a Google search result page with the key text Blue Mountain will be displayed.
- Click Breakfast Blend and a Google search result page with the key text Breakfast Blend will be displayed.
- Navigate to the second page of the table, click Sumatra and an e-mail is displayed as follows: