As barcode

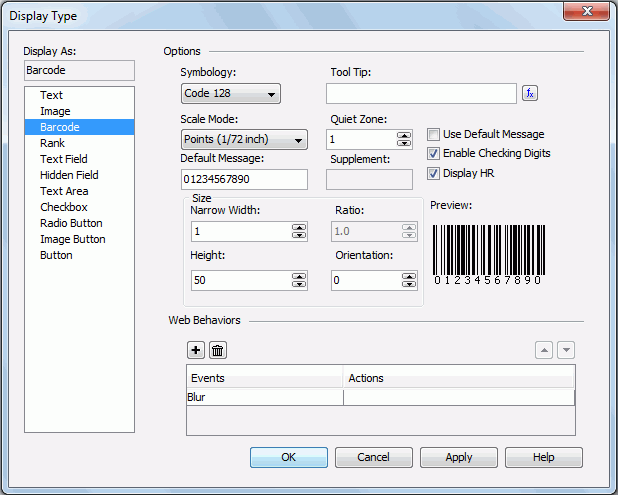
To define the display type of a label as barcode, follow the steps below:

  1. Right-click the label and select Display Type from the shortcut menu to open the Display Type dialog.
  2. In the Display As box, select Barcode. See the dialog.
  3. In the Web Options panel, select the required barcode type from the Symbology drop-down list. You can preview the format of the selected symbology in the Preview box (for details about the different symbologies of barcodes, see Appendix 2: Barcode symbologies).
  4. In the Tool Tip field, enter the tip you want to show for the barcode. Then at server runtime or in HTML results, when you hover the mouse over the barcode, the tooltip will be displayed.

    If you want to use a formula to control the tip, click and select a formula from the drop-down list. You can also click the <CREATE FORMULA> item in the list to create one as required. If the label is in a crosstab, you can also use a crosstab formula created in the crosstab to control the tooltip, or click <CREATE CROSSTAB FORMULA> to create one.

  5. From the Scale Mode drop-down list, select the unit for the values of Quiet Zone, Narrow Width, Supplement, Height and Ratio.
  6. Specify the space around the barcode in the Quite Zone field (most symbologies require quiet zones that precede and follow the barcode).
  7. Change the default value of the barcode in the Default Message field if necessary. If you check Use Default Message, the message will be used as the barcode value when you view the report result. Otherwise, the message will only be used in design mode.
  8. Specify the supplement of the barcode if necessary.

    If you select the barcode type as Code 39, Code 128/128A/128B/128C or Codabar, you will not need to set the supplement.
  9. Set the barcode bar width in the Narrow Width field, and the height of the bars in the Height field.
  10. Specify the width ratio of the thick bar to the thin bar in the Ratio field if you selected the barcode type as Code 39 or Codabar. The ratio can only be 2.0 or 3.0. Any ratio values not equal to 2.0 or 3.0 will be regarded as 2.0.
  11. Specify the rotation angle in degrees in the Orientation field if necessary.
  12. Select the Enable Checking Digits checkbox if you want to include check digits in the barcode.
  13. If you selected the barcode type as Code 39, Code 128/128A/128B/128C, or Codabar, then you can check Display HR to display the barcode numbers together with the barcode.
  14. If needed, bind some web actions to the label in the Web Behaviors box (for details, see Applying web actions to a label).
  15. Upon finishing, click OK to close the dialog.

Notes: