

Saving the report
You can save your report in a Page Report Studio window. To do this, click Menu > File > Save (or the Save button  on the Standard toolbar). The Save Report Template dialog appears. The Sort and Filter options in this dialog signify whether or not to include the sort and filter criteria when saving. Specify the options as required, then click OK, and the report will be saved as a report version.
If the report is newly created and has not yet been saved, the Save As dialog appears. See the dialog.
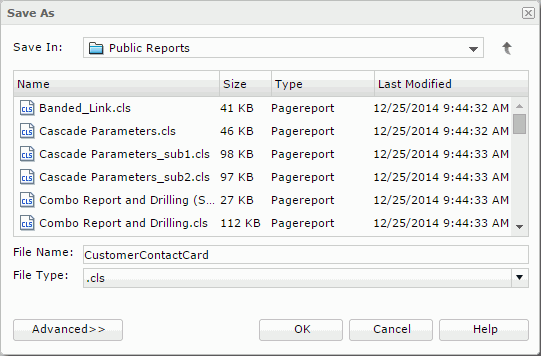
- In the Save in section, browse to the folder where you want to save the report in the server resource tree. The folder may be Public Reports or My Reports. You can use the button
 to go to the parent folder.
The resource table shows the resources in the current directory. Click the column names to change the order of the report in the table list if required.
- In the File Name box, enter the name of the report or use the default name.
- From the File Type drop-down list, specify the type of the saved report.
- Click the Advanced button to set the advanced settings for the report if required.
- The catalog that the report uses is shown.
Specify the relationship between the saved report and the catalog used to run it (activated only when Select Catalog Linked Model is checked in the Profile > Customize Profile > Page Report Studio > Properties > Advanced tab):
- Set Original Catalog as Linked Catalog into Saved Page Report
If checked, the saved report will be linked with the catalog and the saved report will run with the catalog no matter whether the two are in the same directory. If later the catalog is updated, the saved report will run with the latest version of the catalog.
- Set Catalog Copy to Public Reports/My Reports
If checked, the catalog will be copied to the directory where the report is saved and the saved report will run with the copied catalog.
- If you want to save the report together with the sort and filter criteria, check Save Sort Criteria and Save Filter Criteria correspondingly. With the criteria saved, Page Report Studio will automatically apply them to the report the next time it is opened.
- Optionally, input comments in the Description box as a description for the report.
- Click OK to save the report.
To save a copy of a report, click Menu > File > Save As (or the Save As button  on the Standard toolbar) to show the Save As dialog, and then do as above.
Notes:
- You will not be able to save the report to some locations if you do not have the required permissions. You need to have Write access to the directory.
- If one of the report tabs in a report contains subreports, when you save the report, changes you have made on the subreports will not be saved along with the primary report.
- To find a newly saved report version, browse to select the row that the report is in on the JReport Console > Resources page, click Tools > Version on the task bar, and then click the Report Versions tab.