

Dispatching RMI Server Pages requests in multiple server environment
You can dispatch RMI Server Pages requests in multiple server environment, which includes JReport clustered and non-clustered server environment.
Sample solution: dispatch RMI Server Pages requests in clustered server environment using customized dispatcher
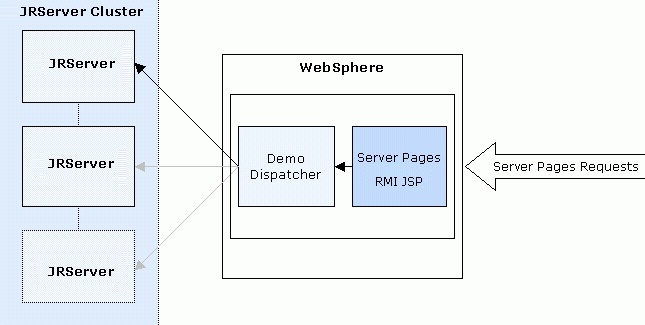
This sample solution is to visit Server Pages JSPs remotely from WebSphere 7 to JReport Clustered Server using customized dispatcher. See the below diagram for the structure:
You should be able to set up a similar service with any Java EE server by following the same procedure based on your preferred application server documentation.
This demo dispatcher dispatches requests from different sessions to different JReport Servers according to Round-Robin algorithm. The dispatcher has the Fail Over function, which will periodically check whether there is any unavailable server in the cluster. No request will be dispatched to the unavailable server until the server is checked to be available again.
In general, the solution can be categorized into the following major steps:
- Set up the server cluster.
- Generate a WAR file containing Server Pages RMI JSP and dispatcher for WebSphere.
- Deploy the WAR file to WebSphere.
- Configure a clustered JReport Server.
In the following sections, we will explain clearly the exact operations you are expected to make in each of the main steps.
Setting up the server cluster
In this example we will set up two into the cluster using the Round-Robin algorithm.
192.168.0.1
192.168.0.2
Refer to Setting up and configuring a JReport Server Cluster for the specific steps of setting up JReport Server in a cluster.
Generating a WAR file containing Server Pages RMI JSP and dispatcher for WebSphere
- Build a JReport Server WAR file as defined by makewar.xml for remote integration. The generated WAR file is saved to the default directory
<install_root>\bin\distribute.
makewar.bat buildRemoteWar -Djrs.remote.host=192.168.0.1 -Djrs.remote.rmiport=1129 -Djrs.rmi.auth_file=C:\JReport\Server\bin\rmi.auth
- Compile the dispatcher DemoRemoteDispatcher.java stored in
<server_install_root>\help\samples\APICluster with <server_install_root>\lib\JRESServlets.jar and <server_install_root>\lib\servlet.jar. The class file DemoRemoteDispatcher.class and some other class files will be generated.
- In the WAR file, drag the class files generated in step 2 to the remote.war\WEB-INF\classes\demodispath folder, assuming that this folder has already been created in the WAR file.
Deploying the WAR file to WebSphere
- Start IBM WebSphere 7.
- Open Administrative Console. You can open Administrative Console by using the Start Menu, or by using the URL:
http://hostname:9060/ibm/console, where hostname is host name or IP address, and 9060 is the port number.
- After successfully logging in, expand the Applications node, and then click Install New Application.
- Click Browse to select your .war file. In the Context root field, type a context path such as /servlet/ ("/servlet" is also ok). Click Next.
- Do not check any option in this page, and then click Next.
- Type RMI_Server Pages in the Application name field. DO NOT check the Precompile JavaServer Pages files option. Click Next.
- Do not make any changes in the next two pages.
- Click Finish in the Summary page. The installing process may take several minutes, wait until the process is completed.
- After the installation process is completed, click Save directly to the master configuration. Then in the Save directly to the master configuration dialog, click Save.
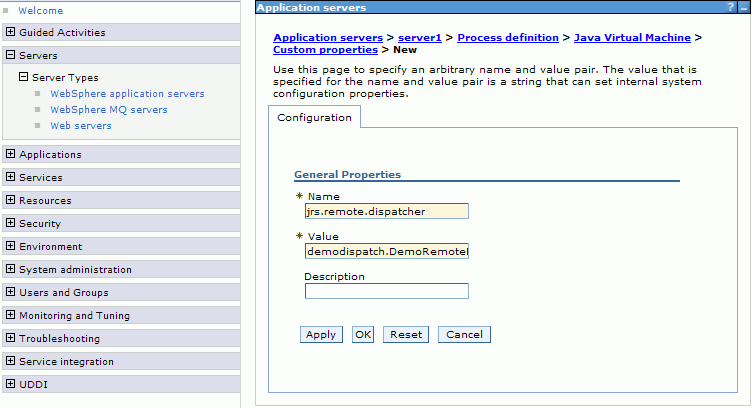
- This step is to configure the dispatcher and cluster server. Go to WebSphere Admin Control to add some properties for this dispatcher. Expand Servers, go through Server Types > WebSphere application servers > server1 > Process definition (in the Server Infrastructure table > Java and Process Management) > Java Virtual Machine > Custom properties (in the Additional Properties table).
Click the New button to add properties for our demo dispatcher com.jinfonet.dispatcher.configFile and jrs.remote.dispatcher.
Figure 1: Add property for com.jinfonet.dispatcher.configFile
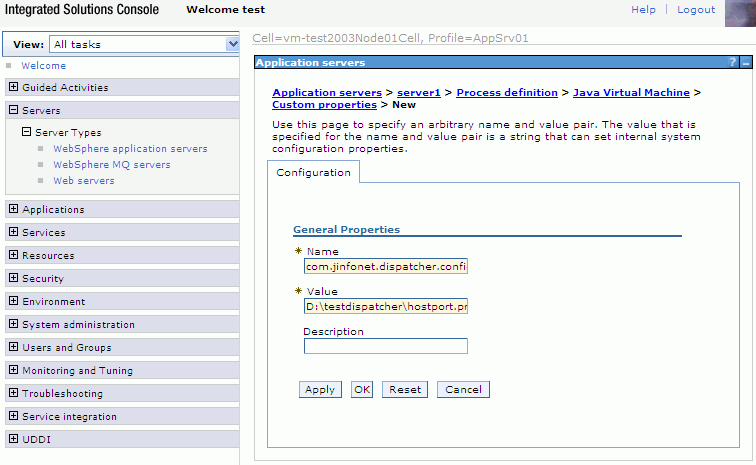
Figure 2: Add property for jrs.remote.dispatcher
Note that the dispatcher DemoRemoteDispatcher.java will read the clustered server information in the hostport.properties file like below:
rmiserver=192.168.0.1:1129

    rmiserver=192.168.0.2:1130

  ...
- If you have set up JReport Server in a cluster, you can append their host and port information to the above text file.
- Click the Save link in the Messages table to save the changes, and then restart WebSphere 7.
Configuring the JReport Server Cluster
- Make sure JReport Server has been started once in order that the server.properties file is generated.
- Change server.properties file in
<server_install_root>\bin as follows:
server.rmiserver.enable=true

    server.rmiadminservice.enable=true
Then you can start JReport Server and access your Server Pages with a URL such as:
http://hostname:9080/remote