
Security dialog
This dialog appears when you right-click Security Entry in Catalog Browser > Data Source > Security, select Add Security Entry from the shortcut menu, input a name for the new security policy and then click OK. This dialog allows you to specify the security settings for a connection-scope security policy. See the dialog.
The following are details about options in the dialog:
User/Group/Role
Lists all the users, roles, groups for the security policy.

Adds a user/group/role. After you click the button, a drop-down menu will be shown:

Exports the users, roles, and groups to an xml file.
Deletes the selected user/group/role.
Edits the selected user/role/group in the displayed dialog. - Quick search toolbar
Type in text in the toolbar to search for the user/role/group in the list below. The names containing the matched text will be shown.
Valid RLS
Specifies whether to use RLS policy for this security entry. If unchecked, the RLS policy will not be applied and all the records will be available to the users.
Valid CLS
Specifies whether to use CLS policy for this security entry. If unchecked, the CLS policy will not be applied and all the records will be available to the users.
Disable Policy Settings
- When it is unchecked, you are able to specify a security policy for the principal. However, if the record level security and column level security are left blank, the principal will not be able to view any data records, unless it inherits some permissions from another group or role.
- When it is checked, you are not allowed to specify record level security or column level security. The principal will have full access to all the data records in the reports which adopt this security policy entry.
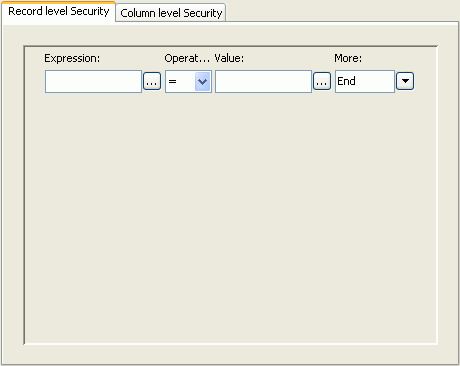
Record Level Security tab
Specifies the condition statements. See the tab.

- Expression
Specifies the field on which the condition is based. You can type in the field directly or click the button  next to the text box to select the desired field in the Expressions dialog.
- Operator
Specifies the operator to compose the condition expression.
-
=
Equal to
- >
Greater than
- <
Less than
- >=
Greater than or equal to
- <=
Less than or equal to
- <>
Not equal to
- in
Causes an enumerated list of values to appear in the WHERE clause predicate, used for evaluating for a true condition. For operator "in", it is allowed to input multiple values in the Value input box and separate the values with comma (,).
- Value
Specifies the value of how to build the condition. You can type in the value manually or click the button  next to the value text box to specify the value in the Expressions dialog.
- More
Lists some additional commands.
- AND
Specifies the relationship between two expression statements as logical AND. If this line is the last line in the expression list, when you select AND or OR, and a new line will be appended to the end of the list as well.
- OR
Specifies the relationship between two expression statements as logical OR. If this line is the last line in the expression list, when you select AND or OR, and a new line will be appended to the end of the list as well.
- Insert Row
Inserts a new line after the current line.
- Delete Row
Deletes the current line.
- New Group
Adds a new expression group to the list. The relationships between two groups can be:
- AND- Logical AND relationship between two groups. Records satisfying both condition groups will be retrieved.
- OR- Logical OR relationship between two groups. Records satisfying either one of the condition groups will be retrieved.
- AND NOT - Records which satisfy the first condition group but not the second will be retrieved.
- OR NOT - Records which satisfy the first condition group, or which do not satisfy the second condition group will be retrieved.
Note: If the policy settings are left blank, the user in this role will not be able to view any records, unless he/she belongs to more than one role, and the other roles have the necessary permissions.
Column Level Security tab
Lists all the available resources in the catalog. Select the required resources to allow or deny them to be revealed to the principal. See the tab.
- Select Column
Specifies the columns that are to be shown to (or hidden from) the principal.
- Allow all
Allows all the columns in the field list to be revealed to the principal.
- Deny all
Hides all the columns in the field list from the principal.
- Allow
Allows the selected columns in the field list to be revealed to the principal.
- Deny
Hides the selected columns in the field list from the principal.
OK
Accepts changes and closes the dialog.
Cancel
Does not retain the changes and closes the dialog.
Help
Displays the help document about this feature.
Related topics:


 next to the text box to select the desired field in the Expressions dialog.
 next to the value text box to specify the value in the Expressions dialog.