Applying web actions to a basic web control
A web action can be bound to a basic web control, and then when the trigger event, such as click occurs, the web action will be performed. This allows you to customize a web control to make it respond to some events, and execute corresponding actions, such as sorting and filtering. For example, you can insert a button in JReport Designer and associate an action with the button's onclick event. Then, when you view the report at runtime and click the button, the defined operation will be executed.
To bind web actions to a basic web control:
- Right-click the web control and select Display Type from the shortcut menu.
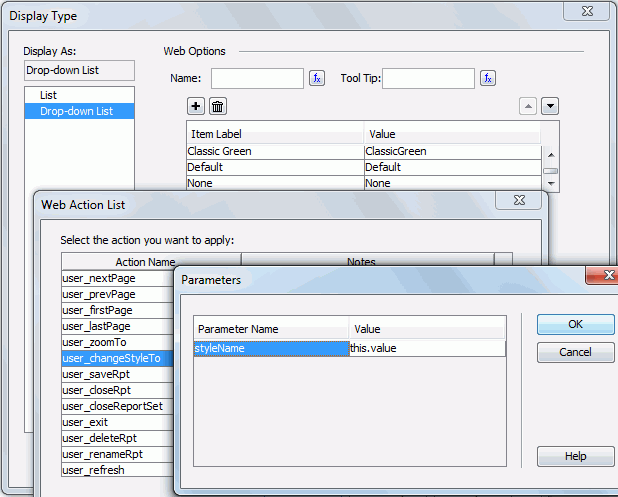
- In the Web Behaviors box of the Display Type dialog, choose an event from the Events column, then click in the Actions column and click
 that appears in the text box.
- In the Web Action List dialog, select the required action and then click OK.
- Click
 in the Display Type dialog to add more web behavior lines and specify the events and actions accordingly. If a web behavior is not required, click
  to remove it.
- Adjust the order of the added web actions by clicking
 or
or  . Then, when an event that has been bound with more than one action happens, the upper action will be triggered first.
- When done , click OK to accept the settings.
For more information about web actions, see Applying web actions to a label.
Example of applying web actions
In the following example, a sample report is built for guiding you through the process of using web controls and applying web actions step by step.
Step 1: Create the sample report
- Design a standard banded report based on the WorldWideSales query in the SampleReports.cat catalog (make sure to remove the report title in the New Page Report dialog), which shows the following detail fields: Country, Product Type Name, Product Name, Unit Price, Quantity, Discount, and the formula Total (
@"Unit Price" * @Quantity - @"Unit Price" * @Quantity * @Discount/100), applies the filter "COUNTRY = China AND PRODUCT TYPE NAME = Decaf", and uses the Classic style.
- Insert a crosstab into the report and place it below the banded object. The crosstab shares the same dataset with the banded object, comprises the column field: Product Type Name, row field: Category, and aggregate field: Total (aggregate function: Sum) and applies the Classic style.
- Click View > Page Header on the menu bar to have this panel visible, then set its Height property to 1.0 in the Report Inspector to hold all the web controls that will be inserted in the report later.
- Save the report.
Step 2: Apply a web action without parameters
First, we want to allow the report user to click a button in the report to show the Search dialog of Page Report Studio. To achieve this:
- Select the page header panel and click Insert > Web Controls > Button to insert a Button web control in it.
- Right-click the button, and select Display Type from the shortcut menu.
- In the Web Behaviors box of the Display Type dialog, specify event to Click, then click in the Actions column and click that appears in the text box.
- In the Web Action List dialog, choose user_showSearchDialog to be web action of the button, then confirm the settings.
- Go to the Report Inspector and set the Text property of this button to Search.
- Save the report.
Step 3: Apply a web action with parameters
Now we want to allow the report user to rotate the crosstab in the report and to change the report style.
- Insert another Button web control in the page header panel of the report and place it next to the Search button.
- Specify the Click event and user_rotateCrosstab action to the button as explained above, then set &CTCrossTab to be the value of the action parameter instanceName (CTCrossTab is the name of the crosstab we can see in the report structure panel of the Report Inspector, and here the symbol & shall be prefixed to the crosstab name).
- In the Report Inspector, edit the Text property of the button to Rotate Crosstab.
- Insert a Label object in the page header panel and place it below the two buttons, then resize the label and edit its text to "Change Report Style To:".
- Insert a Drop-down List web control next to the label.
- Right-click the drop-down list and click Display Type shortcut menu.
- In the Display Type dialog, add these items and corresponding values to the drop-down list (to add an item line, click ):
| Item Label |
Value |
| Classic |
Classic |
| Classic Blue |
ClassicBlue |
| Classic Green |
ClassicGreen |
| Default |
Default |
| None |
None |
Then, in the Web Behaviors box of the dialog, set Event to Data Change, Action to user_changeStyleTo, and specify the value for the web action parameter styleName to this.value.
- Save the report.
Step 4: Apply a web action with the Builder Wizard
The actions Filter, Sort and Parameter have a Builder Wizard. Now we would like to use the wizard to allow the report user to sort records in the banded object by one of the specified fields.
- Insert another Drop-down List web control into the page header panel, and place it below the above web controls. The drop-down list is displayed as MultiValueContainer1 in the Report Inspector.
- Right-click the drop-down list and click Display Type shortcut menu.
- In the Display Type dialog, add these items and corresponding values to the drop-down list:
| Item Label |
Value |
| Unit Price |
UNIT PRICE |
| Quantity |
QUANTITY |
- Insert a List web control next to the drop-down list. The list is displayed as MultiValueContainer2 in the Report Inspector.
- In the Display Type dialog for this list, add these items and corresponding values:
| Item Label |
Value |
| Ascending |
Ascending |
| Descending |
Descending |
- Insert a Button web control and place it next to the list, then right-click the button and click Display Type on the shortcut menu.
- In the Display Type dialog, specify Event to Click and Action to Sort, then in the Sort - Web Action Builder dialog, select MultiValueContainer1 from the Sort on column, and MultiValueContainer2 from the Sort Value column. Confirm the settings, and go to the Report Inspector to modify the Text property of the button to Sort.
- Save the report.
Step 5: Preview the report in Page Report Studio and applying the web actions
- Click View > Preview As > Page Report Result to preview this report in Page Report Studio.
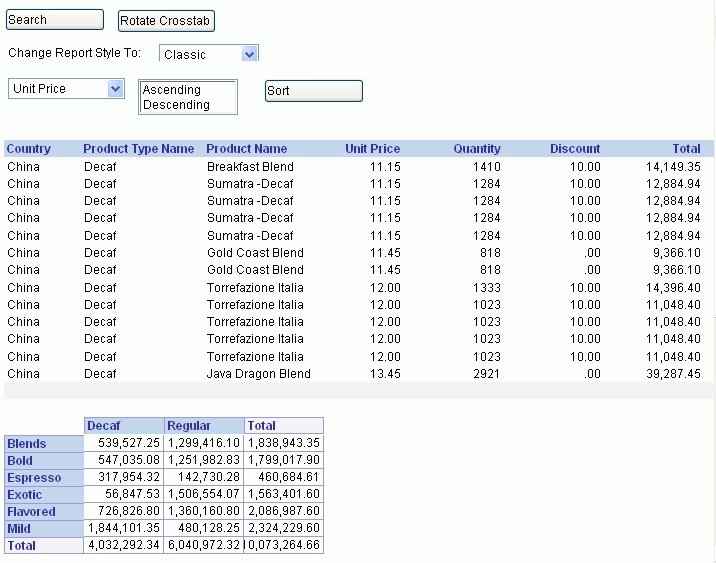
- Click the Search button and the Search dialog appears.
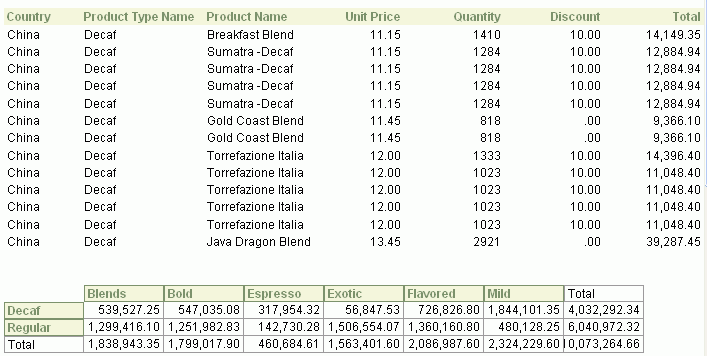
- Click the Rotate Crosstab button, the columns and rows of the crosstab are rotated.

- Select a style from the Change Report Style To drop-down list, for example, select Classic Green, and the report style now changes to the selected one. It affects both the banded object and the crosstab.
Note: You may notice that the value of the drop-down list does not change to the selected one after the report style is updated. To update the drop-down list value to the current report style, you need to append another action user_changeCompProperty to the event Data Change to the drop-down list.
- Select a field name from the third drop-down list and then the sorting direction from the list. Here we select Unit Price and Descending respectively, then click the Sort button.
The records in the banded object now are sorted based on the Unit Price values descendingly.