Lesson 5: Scheduling a report from JSP

You have been asked to run EmployeeInformation.cls from the JSP application and allow the user to schedule the report from the JSP application. We will use an HTML page to ask the user for the scheduling information and then run the report simply by calling submitScheduledTask().

This lesson needs an HTML and a JSP file:

  1. Copy scheduleRequest.html in <install_root>\help\samples\JSPSamples\JinfonetGourmetJavaDemo to <install_root>\public_html\jag.
  2. Open scheduleRequest.html in your favorite editor.
    <!DOCTYPE HTML PUBLIC "-//W3C//DTD HTML 4.0 Transitional//EN">
    <html>
    <head>
    <title>Schedule a report to run once at a future time.</title>
    </head>
    <body>
    <p>Schedule running EmployeeInformation.cls in PDF format and publish the pdf file to the servers file system:
    <form method=get action="scheduleReport.jsp">
    Specify the pdf file path and name :
    <input type="text" name="filepath" value="C:\temp\" size="30">
    <input type="text" name="filename" value="EmployeeInformation.pdf" size ="20"><br>
    Run this task on: <input type="text" name="month" value="1" size="5"> (Month)
    <input type="text" name="day" value="1" size="5"> (Day),
    <input type="text" name="year" value="2007" size="7"> (Year), at
    <input type="text" name="hour" value="17" size="5"> (Hour)
    <input type="text" name="min" value="0" size="5"> (Minute) <br><br><br>
    <input type="submit" value="Schedule this task">
    </form>
    </body>
    </html>
  3. Copy scheduleReport.jsp in <install_root>\help\samples\JSPSamples\JinfonetGourmetJavaDemo to <install_root>\public_html\jag.
  4. Open scheduleReport.jsp in your favorite editor to view it.
    <%@ page import="jet.web.dhtml.*"%>
    <!-- specify the error page for this is jsp, a user can customize it and it's optional. -->
    <%@ page errorPage="../dhtmljsp/errorpage.jsp" %>
    <!-- include the jsp for check user login -->
    <%@ include file="../dhtmljsp/AuthCheck.jsp" %>
    <html>
    <head>
    <title> Schedule according to date and time provided by scheduleRequest.html </title>
    </head>
    <body>
    <%
    //get RptServer
    HttpRptServer server = jet.server.api.http.HttpUtil.getHttpRptServer(request);
    Properties props = new Properties();
    props.put("jrs.cmd", "jrs.submit_schedule");
    props.put("jrs.task_class", "jet.server.schedule.jrtasks.PublishToDiskTask");
    props.put("jrs.to_disk", "true");
    props.put("jrs.to_disk_pdf_path_type", "1");
    props.put("jrs.result_type", "2");
    props.put("jrs.to_pdf", "true"); // run in PDF format
    props.put("jrs.launch_type", "1");
    props.put("jrs.catalog", "/USERFOLDERPATH/admin/JinfonetGourmetJava/ JinfonetGourmetJava.cat");
    props.put("jrs.report", "/USERFOLDERPATH/admin/JinfonetGourmetJava/ EmployeeInformation.cls");
    props.put("jrs.auth_uid", "admin"); // set log user ID to avoid login dialog popup
    props.put("jrs.auth_pwd", "admin"); // set log user password to avoid login dialog popup
    props.put("jrs.pdf_dir", request.getParameter("filepath"));
    props.put("jrs.pdf", request.getParameter("filename"));
    props.put("jrs.exe_year", request.getParameter("year"));
    props.put("jrs.exe_month", request.getParameter("month"));
    props.put("jrs.exe_day", request.getParameter("day"));
    props.put("jrs.exe_hour", request.getParameter("hour"));
    props.put("jrs.exe_min", request.getParameter("min"));

    //get user information
    HttpUserSessionManager umg = server.getHttpUserSessionManager();
    UserSession us = umg.getUserSession(request);
    String userId = us.getUserID();

    //Submit a scheduled task and return the task ID.
    String taskID = server.submitScheduledTask(userId, props);
    out.print("The task has been scheduled. The task ID is:" + taskID);
    %>
    </body>
    </html>
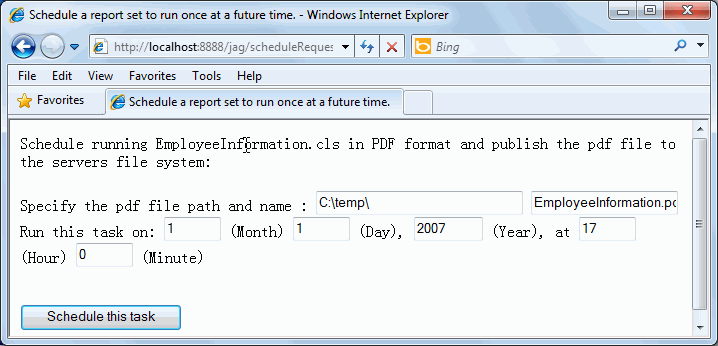
  5. Browse http://localhost:8888/jag/scheduleRequest.html, and the following page appears:

  6. Specify the current date, but choose a time about 10 minutes from the current time. You can change the default file name and scheduled location if desired.

    Note: Only whole numbers can be specified for each field.

  7. After the specified time, view the report result in its target location.

    Scheduling reports in this way has two advantages:

Lesson 5 summary

In this lesson you have learned how to use JSP and JReport Server API to run a report according to a schedule provided by an application.